Making & Stretching Your Own Canvas
Below are some studio notes from our canvas making workshops that will aid you in stretching your own canvas over our Museum 45, No 6 and No 4 stretcher bars. If you are interested in taking part in one of our workshops then find the latest schedule on our Art Classes & Workshops page.
Equipment
Some useful equipment that you might need when stretching your own canvas:
- Rubber headed mallet
- Robust staple gun
- Strong staples (8mm or 6mm)
- Canvas pliers
- Stretcher bars
- Cross bars if necessary
- Cotton canvas or linen
- Staple remover
- Building the Stretcher Frame
Pegasus Art supplies three non-warping stretcher profiles with interlocking mitre joint ends. All lengths have a raised wooden edge which keeps the canvas from pressing directly against the frame. The mitred ends of the stretcher bars are knocked together with either a wooden hammer or a soft headed rubber mallet, to form the basic shape. Insert any crossbars during this stage. To ensure the frame is square, make sure the diagonal measurements are equal.
Take a look at our range of wooden stretcher bars here.

Stretching the Canvas
Cut your canvas or linen, taking care to ensure there is enough material overlap to stretch and staple on the reverse (8 cms for M45's, 5 cms for No. 6 and No 4 bars). Canvas pliers help to gain purchase on the fabric and to avoid tearing the material. Choose a robust staple gun with non-rusting staples.
All woven fabrics have a warp thread and weft thread. The warp thread runs the length of the canvas roll. The weft thread is the width of the roll, edged by a selvage. When stretching the warp thread should ideally be placed over the shortest distance e.g. on a frame 30 cm x 50 cm, the warp thread should pull across the 30 cm.
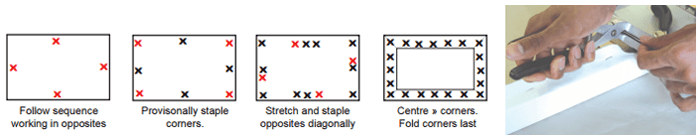
Following the sequence in the diagrams pictured to stretch your canvas. Wedges can be inserted into the corners after sizing and priming.
Sizing & Priming
Sizing the fabric reduces the absorbency of the fabric so that subsequent applications of primer do not sink. Traditional rabbit skin glue size can be used or there are acrylic versions available in our sealer and size range too. A common method of sizing is to dilute acrylic primer with water to use as a first layer on your fabric.
To complete the priming of your canvas frame, two or three coats of primer should be applied evenly. Flat hog brushes, with short handles of a good width (3-4 inches) are ideal for this purpose. Depending on your preference, the last two layers can be sanded after drying to provide a smoother final surface which shows the canvas weave.
The application of size and primer provides a tough, durable ground on which to work.
Flexible gesso primers (such as Golden) can provide a softer, more absorbent surface which many artists prefer.
Warning about PVA: Diluted PVA is best avoided as a size; it has a tendency to yellow with age and become brittle. Household paints, primers and undercoats are sometimes used by artists but the ingredients are not long lasting and can become unstable - possibly ruining your masterpiece at some point in the future!
A note on stretching and priming linen: When linen is removed from the loom, it contracts. Before use for painting, linen needs to be treated by a wetting process to counteract the crimping effect and straighten the weave of the fabric. The easiest way to do this is to loosely staple the fabric to the stretcher frame. Spray the material with water, or paint water on with a large flat brush. Leave the fabric to dry thoroughly before stretching as normal.